
May 11, 1961
Bulletin No. SB-845
Gearcases
SUBJECT: Gearcase leakage prevention;
5½ thru 50 h.p. engines (CD thru V-50 model series)
Additional references:
5½ thru 40 h.p. series - P. 192-27 of Gen. Service Manual.
V-50 series - P. 110 of V-4 Service Manual.
For the purpose of discussing gearcase leakage problems, the 40 h.p. model RD-23 is
used as an example. Except for specific part number references, the following
assembly procedure is also applicable to the 5½, 7½, 10, 15, 18, 25, 30, 35 and 50 h.p.
engines because these have similar gearcase designs and therefore require the same
basic assembly procedure and precautions.
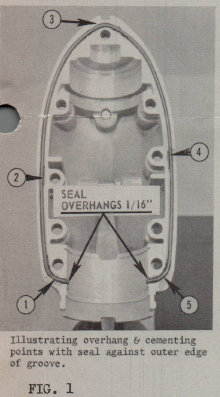
Gearcase leakage correction and prevention is first of all
primarily a matter of carefully cutting seal #302604 to the
proper length followed by careful installation in the skeg
groove with liberal application of Marprox Sealer 1000. The
"spaghetti" seal, as gearcase seal 302604 is sometimes called,
must, without stretching, be placed against the outer edge of
the groove and must also overhang the groove's ends about
1/16th inch (no more!) on both sides so the seal's ends
will squarely butt against housing 303050 without causing
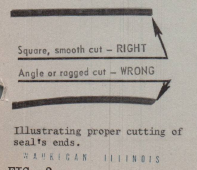
the seal to buckle, figure 1. Be sure to cut the seal ends
square - not at an angle! (figure 2). The square cut, and
butt, is very important because the smallest space between
housing 303050 and the ends of the seal will permit
lubricant leakage. Neither must the seal be permitted to
buckle because this is also apt to allow leakage.
With the seal properly cut to length with square ends, and
correctly located at the outer edge of the skeg's groove,
1. Spot cement the seal at five (5) points to hold it
in position, (numbered arrows, figure 1).
2. Apply a liberal amount of Marprox Sealer 1000 over the
entire mounting surface on the upper gearcase, and
another touch-up application at both ends of the spaghetti
seal and around the bends at points 1 and 5 on the skeg,
figure 1.
3. To minimize disturbance of the seal in positioning the
skeg on the upper gearcase, insert a gearcase screw in
each of the skeg's three (3) screw-holes at points 1,
3 and 5, figure 1. These screws serve as guides and
assist in more readily positioning the skeg.
4. Assemble the upper gearcase and skeg, but be sure not
to displace the spaghetti seal. GIVE SPECIAL ATTENTION
TO THE OVERHANGING SEAL ENDS TO BE CERTAIN THEY WILL
SQUARELY BUTT AGAINST HOUSING 303050. DO NOT PERMIT
THEM TO BECOME PINCHED, OR WEDGED, BETWEEN THE SKEG
AND THIS HOUSING!!!
(over)