Johnson Service Bulletin SB-1467 (July 1978) - Integral Tilt and Trim Stuck in Tilted Position
Factory instructions for preventing hydraulic lock in Johnson integral tilt and trim systems and releasing a locked unit. Includes reverse lock check valve service procedures, torque specifications, and two factory photographs.

SUBJECT: INTEGRAL TILT AND TRIM STUCK IN TILTED POSITION
Under certain conditions the integral tilt and trim unit may become stuck in the full tilt up position. Although the motor can be moved down to the trim range by opening the manual release valve and motored back up again after the manual release valve has been closed, it will still be hydraulically locked in the tilt up position.
CAUSE:
If the motor is stored and/or trailered in the full tilt up position with the trim rods extended, a change in temperature from low to high will cause the oil in the trim cylinders to expand, resulting in increased pressure between the tilt trim separation valve and the trim check valve. If this pressure exceeds the “pop off” pressure of the trim down pump relief check valve then the pump pressure will open the trim down relief valve before it opens the trim check valve, routing all of the pumped oil back to the reservoir.
PREVENTION:
To prevent a hydraulic lock from occurring, follow these procedures whenever trailering or storing the motor in the tilted position:
a. Tilt motor up and set trail lock.
b. Tilt motor down against trail lock and continue to tilt down until the trim rods are fully retracted.
PROCEDURE FOR UNLOCKING:
Use the following procedure for correcting a hydraulic lock:
- Tilt the motor all of the way up and set the trail lock.
- Open the manual release valve one turn.
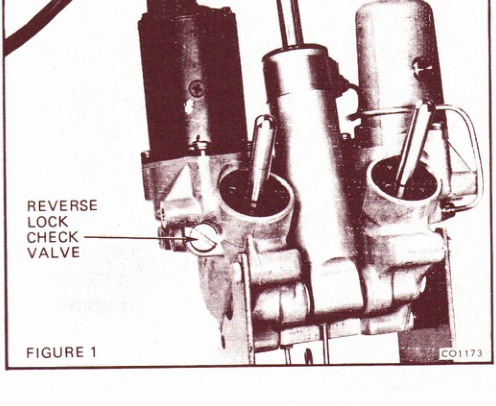
- Remove the Reverse Lock Check Valve. See Figure 1.
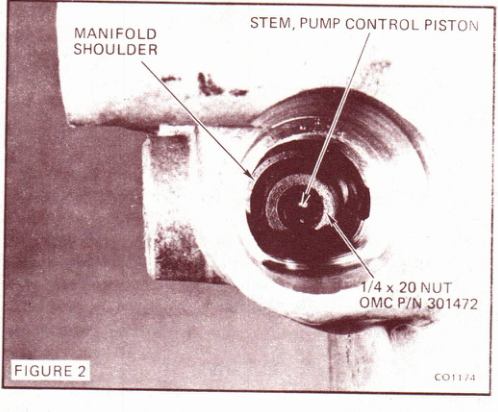
- Place a 1/4 x 20 OMC P/N 301472 nut over the stem of the pump control piston making sure that the nut is inside of the shoulder in the manifold. See Figure 2.
- Replace and torque the Reverse Lock Check Valve to 50-60 in. lbs. (5.5 - 7.0 N·m). As the check valve is tightened against the nut, the nut will force the pump control piston to open the trim check valve.
- Remove the check valve and 1/4 x 20 nut.
- Check o-rings on the check valve and then reinstall the valve and torque to 50-60 in. lbs. (5.5 - 7.0 N·m).
- With the motor still resting on the trail lock, top off the oil reservoir with OMC Trim & Tilt fluid and close the manual release valve.
- Cycle the trim unit several times to insure correct operation.
- Inform the owner of the motor of the preventative measures he should take in the future.