Johnson Service Bulletin #644 (1958) - V-50 Carburetor Adjustment

Issued April 23, 1958. Factory instructions for adjusting and balancing the high- and slow-speed needles of the Johnson V-50 twin-barrel carburetor. Includes all 12 steps, three original adjustment photographs, and the warning about keeping the gearcase plate installed during tank testing.

Johnson Service Bulletin header
April 23, 1958SERVICE BULLETIN #644
TO ADJUST AND BALANCE SLOW AND HIGH SPEED NEEDLES OF THE V-50 "TWIN" BARRELED CARBURETOR
Factory carburetor adjustment photograph 1
Factory carburetor adjustment photograph 2
Factory carburetor adjustment photograph 3

Both slow and high speed needles in the "twin" barreled carburetor of the V-50 are adjusted and balanced during final test run at the factory. Ordinarily no further adjustment is necessary beyond that within the range provided to compensate for atmospheric and other prevailing conditions of operation.

Should both the slow and high speed needles, however, require balancing and/or adjusting beyond the established range (factory adjusted) proceed as follows -

  1. Note that movement of both high speed needles are synchronized by means of a gear arrangement and that limited final adjustment to correct for specific conditions of operation is accomplished by manipulation of the synchronized adjusting lever - turning right or left to obtain desired results; right to enrich the fuel-air mixture and left to lean it out. The slow speed needles though not synchronized, are also provided with means for limited adjustment beyond original factory setting. In this instance, both needles must be individually or separately manipulated (within the established range) to best "slow" running position.
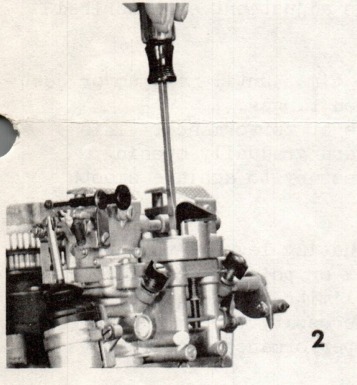
  2. Lift the high speed synchro/adjusting lever off its seat - far enough to clear the synchronizing gears assembled to each high speed needle. Turn the index or pointer end to left or right until it comes to rest on the edge extending above the gear housing. The synchronizing gears are now dis-engaged thus permitting individual adjustment of each high speed needle to properly "balance" the fuel-air mixture flowing thru each barrel of the carburetor. (See Illustration 1).
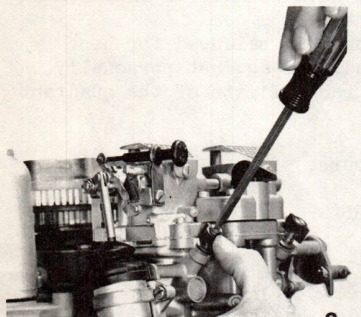
  3. With screw driver, carefully close both high speed needles. Turn right until each comes to rest gently on its seat in the carburetor body (CAUTION - both high and slow speed needle seats may be permanently damaged by jamming or turning down too tightly). From this closed position, back-off (turn left) each high speed needle approximately 5/8 turn. (See illustration 2).
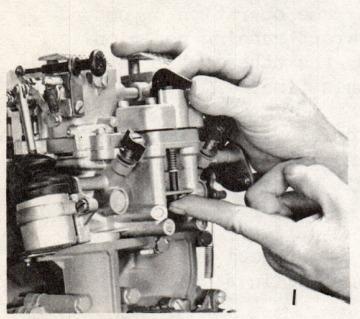
  4. Proceed to the slow speed needles. Force limiting adjusting bracket (embracing the hexagonal head) down sufficiently to clear - use thumb as shown to hold. (See illustration 3). Turn right with screw driver until the needle rests gently on its seat, then back-off approximately 1½ turn. Repeat like operation on the second slow speed needle.
OVER

Superior Service Spells Satisfaction
SERVICE BULLETIN #644 - page 2
  1. It is now assumed that the motor with correct test wheel is installed and securely mounted in the test tank. Start the motor and permit to run until normal operating temperature has been reached - indicated in the thermostatically controlled V-50 by a decided increase in water "spurting" from the discharge tube in the exhaust stack assembly.
  2. Advance speed control to full open position. Obviously, under present conditions of carburetor needle settings, erratic performance is to be expected. Select one of the high speed needles - turn it left or right as required to achieve a perceptable improvement in motor performance. Repeat same operation on second high speed needle - turn it right or left to best apparent running position. Alternately repeat in this manner - adjusting one then the other until both needles appear to be in balance for best running at this time.
  3. Throttle the motor to slow idling position. Erratic or sluggish idling performance undoubtedly will prevail with preliminary slow speed needle settings at 1½ turns open. Adjust alternately, each slow speed needle until both adjustments appear in balance for best slow speed running.
  4. With the slow speed needles presumably in balance for slow speed then go back to further balancing of the high speed needles as described in step 6 above.
  5. After having further balanced the high speed needles, set throttle for slow speed running. Proceed to re-balance the slow speed needles adjustment as described in step 7 above, for best slow speed performance.
  6. It may be found necessary to repeat the above several times until maximum or best performance is obtained in both the slow and high speed ranges. Check for adjustment and balance in intermediate range of performance. This may be accomplished by throttling down to idle speed and gradually opening throttle to full speed. Re-adjust and balance if necessary to achieve smooth operation thru out entire speed range.
  7. Restore position of the high speed needle synchro/adjusting lever with integral gear engaging like high speed needle gears. The index or pointer end of the lever should then fall midway (position 3) between extreme limits of the quadrant for high speed adjusting of fuel-air mixture, as may be necessary to compensate for atmospheric or other conditions relating to eventual performance requirements.
  8. Restore position of each slow speed adjusting bracket with pointer or index end falling at mid point of the limited adjusting quadrant. Once the high and slow speed needles have been adjusted and balanced for best average performance, the operator (owner) should be advised against personally disturbing this balance - other than that within the range limits of the quadrant provided for the purpose.
Very truly yours,
JOHNSON MOTORS
Arvid Olson
Arvid Olson
Service Promotion Manager
P.S. When tank testing, do not remove plate on side of the gear case. This is part of the re-circulating system in operation during warm-up period. The motor will not reach pre-determined running temperature if this cover plate is removed - the carburetor needle cannot be properly adjusted.
vl
Back to service bulletin index