Back to 1970s OMC service bulletins
Evinrude Accessories Bulletin #1086 - Power Trim and Tilt Service Tips
Issued June 1975, this nine-page bulletin covers systematic diagnosis of Calco power trim and tilt units used on 50 through 135 HP Evinrude models. It includes trim gauge checks, motor and switch tests, hydraulic leakdown diagnosis, and factory hydraulic diagrams. Pages 3-7 are transcribed for searching; pages 1-2 and 8-9 retain full-page factory images.
PAGE 3SERVICE BULLETIN #1086
TROUBLESHOOTING THE ELECTRICAL SYSTEM
Test equipment required - 12 volt light bulb; 12 volt test light or volt-ohmmeter
1. Pump motor does not operate
With Key "On"
A.
C.
Check for power between red/white tracer wire (center terminal up-down switch) and "G" terminal of gauge or other
good ground. Then with switch in "up" position check between blue/white tracer wire and ground. With switch in "down" position check between green/white tracer wire
and ground. Tests bad - repair or replace switch.
With motor connector open and switch in "up" position check for power between blue/white tracer wire and black wire
at connector. Repeat test switch in "down" position green/white tracer wire to black wire.
With connector near pump motor plugged in, repeat test on side of connector toward tilt motor "up" blue to black (larger)
12 gauge wire and "down" red to black (larger) 12 gauge wire.
With Key "Off"
D.
Tilt motor-scribe alignment marks between end cap and motor frame and reservoir loosen packing nut on wire then loosen motor end cap. Gently lift end cap while feeding cable through cap to expose three spade connectors.
Note: green/white tracer wire changes to red from connector to motor. Be sure that all spade connectors are clean and make good contact.
If all tests through (D) are okay, before reassembling, test circuit breaker for continuity with ohmmeter (should have no measurable resistance on low ohm scale) If it tests good, this indicates bad motor.
2. Motor does not run with switch in "up" position, (3 and 4 cylinder units).
With Key "On"
A.
B.
Check trim switch with test (1A thru 1C) above - "up" circuit only.
Test above okay-check solenoid - in "up" circuit near battery. If solenoid clicks check for 12 volts at blue/white tracer wire connected to big post on solenoid with test light or voltmeter. Bad test - replace solenoid. When solenoid does not click when "up" switch is activated check solenoid ground wire for contact and continuity. Test for power between blue/white tracer wire on small terminal of solenoid and black wire. Wiring test goodreplace solenoid. Solenoid okay test the spade connector blue wire under motor end cap as in (1D).
Test (2A) through (2D) okay motor can be presumed badrepair or replace it.
PAGE 4SERVICE BULLETIN #1086
PAGE 4 SERVICE BULLETIN #1086
3. Motor does not run with switch in "down position.
With Key "On"
A. Check for power at switch with switch in "down" position between green/white wire and "G" terminal of gauge or other ground.
B. Check for power switch "down" between red wire and black (larger) 12 gauge wire on the motor side of connector. (Changes color from green/white tracer to red at connector).
C. Check as in (1D) at red wire spade connector.
D. Test (3A) through (3C) okay-motor can be presumed badrepair or replace it.
4. Self Energizing Switch
A. Sometimes water or corrosion in trim switch will cause motor to energize fully or partially draining power from battery. A visual inspection will often reveal this
condition.
a a Battery must be disconnected or switch removed from
system for next test, or ohmmeter will be destroyed.
B. Connect an ohmmeter to the switch center terminal and the up and down terminals. With switch off-switch is okay if resistance is infinity for each terminal. A reading below 50000 ohms indicates switch is faulty - replace it.
C. With red/white tracer wire disconnected - attach ohm-
meter to center terminal of switch, other lead to
ground. A resistance of less than 50000 ohms indicates
faulty switch.
D. Note: The normal running amperage of the motor when
running down is 40 to 45 amps. It is 45 to 55 amps when
running up. Unit should travel up through trim range in maximum of 9 seconds.
Unit should travel up through tilt range in maximum of
6 seconds.
IE. Note: Early installation instructions suggest adding a fuse between the battery and the tilt switch. It is not necessary to add a fuse in this line and the early instructions regarding installation of a fuse should be disregarded, since a thermal overload switch is built into the trim motor.
5. Water in the Motor
This condition has been encountered in the field and can usually be corrected by checking the following three areas:
A. The frame screws through end cap have heads recessed in cavities in the cap. Since water collects here and may leak into the motor be sure the nylon washers are under the head, then fill these cavities with OMC Silicone Sealer to prevent leakage.
B. O-rings between the end cap and motor frame or the motor frame and oil reservoir sometimes leak if installed incor-
rectly and will require replacement.
PAGE 5SERVICE BULLETIN #1086
PAGE 5 SERVICE BULLETIN #1086
C. The cable nut where the cable enters tne motor end cap may not seal allowing water to enter so check it for tightness. OMC Silicone Sealer can also be used on the @ cable and nut or silicone grease on the o-ring under the nut to eliminate leakage.
TROUBLESHOOTING THE HYDRAULIC SYSTEM
NOTE: With unit tilted up check the oil level in the reservoir, add oil if needed. Next check motor to be sure it runs both directions. Tools required-various special trim and tilt service tools and common hand tools as described in service manual.
Caution: Extreme cleanliness must be observed when filling the trim and tilt unit or when handling the internal components.
1. Leakdown - Trim Range Only
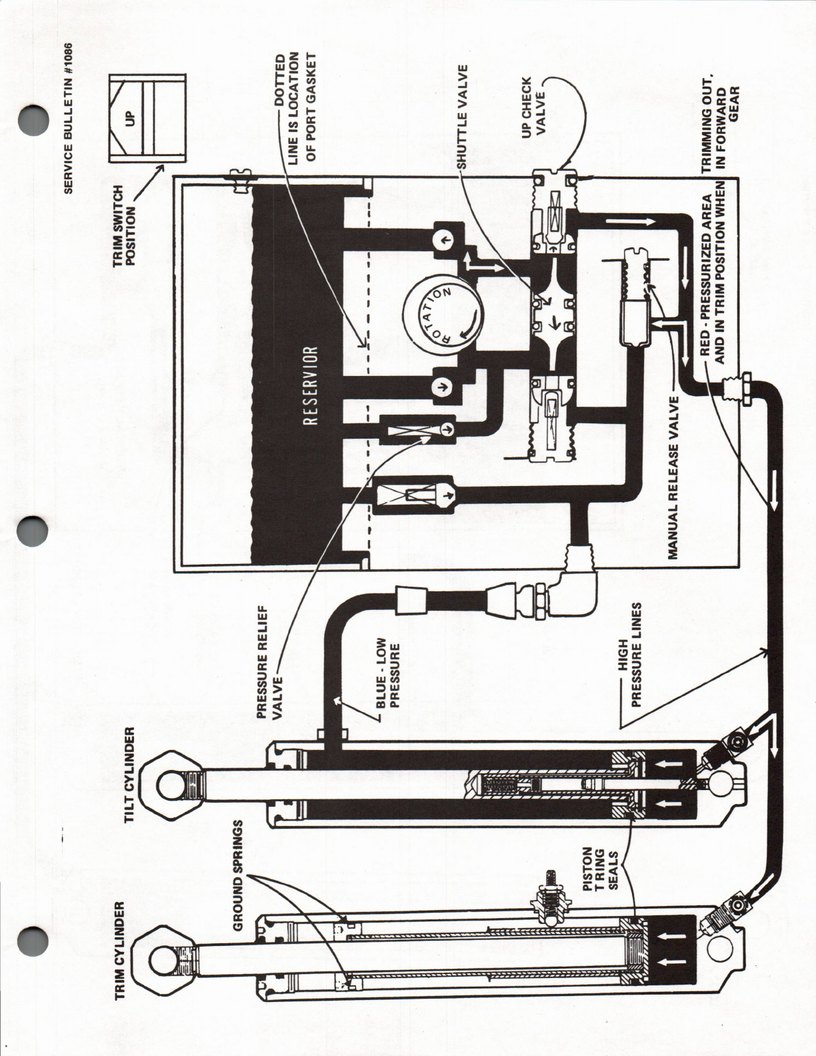
A. The parts of the pump and reservoir assembly and the high pressure line can be eliminated since they would allow leakdown in both trim and tilt range.
B. The (T) ring seals in both cylinders can be eliminated except in infrequent cases of high pressure leaks since the pistons are subjected to the same pressure in trim and tilt range.
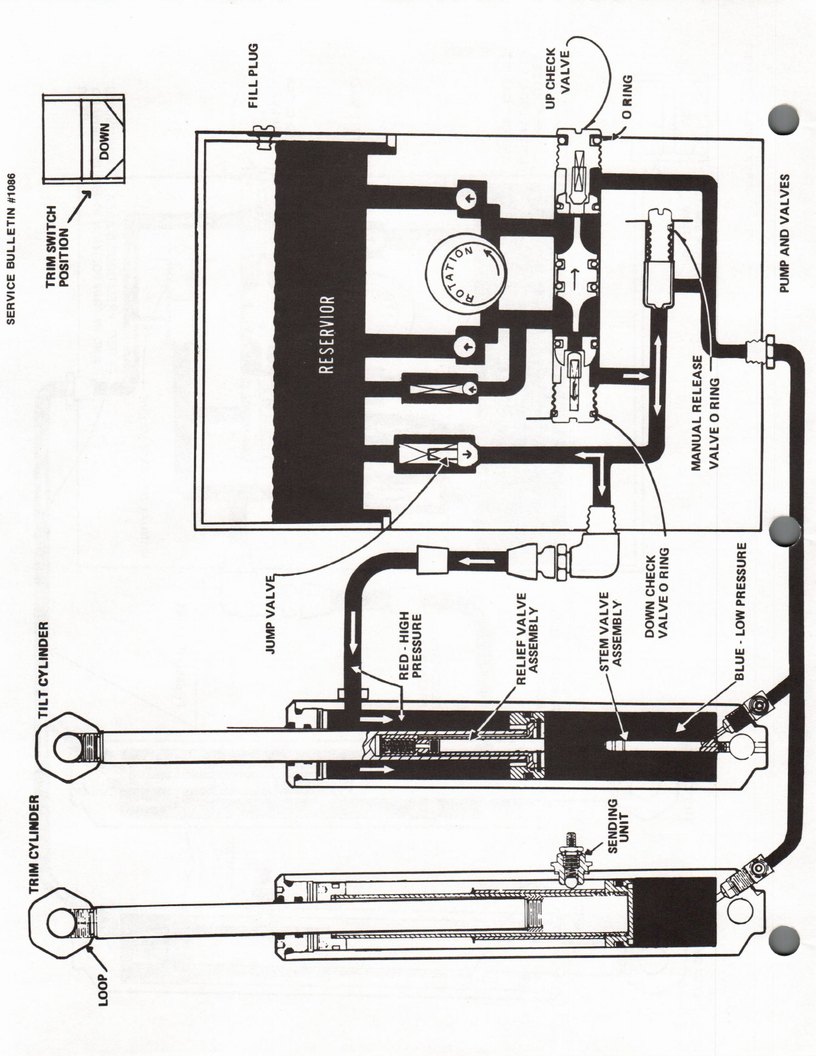
C. Problem is most likely stem valve o-ring. However, trim cylinder should be checked as in C page 6. If this tests YU good then proceed to repair stem valve assembly and relief valve assembly in tilt cylinder as per service manual.
2. Leakdown - Tilt Range Only
A. The areas of (1A) through (1B) can be eliminated for the same reasons.
B. Problem must be in tilt cylinder relief valve in the relief valve assembly. Replace the assembly.
3. Leakdown - Both Trim and Tilt Ranges A. Visually inspect the high pressure hydraulic line. B. Pump component inspection.
a. Visually inspect manual release valve for flared metal end or damaged rubber sealing cushion. Carefully inspect seat for damage or foreign matter. b. Remove and inspect up check valve, if cutaway portion is twisted replace valve. Caution: Carefully work the check valve into position when installing to assure that o-ring is not damaged by threads or sharp edges of oil passage. Torque check valves to 10-20 in. lbs. Do not over torque. e@
PAGE 6SERVICE BULLETIN #1086
PAGE 6
C.
SERVICE BULLETIN #1086
c. The pump cover "port" gasket is not shown in the parts catalog but it is part of the pump repair kit P/N 172886. This sometimes fails when exposed to extreme hydraulic pressure as in hitting an underwater obstruction. To inspect for this failure remove the pump assembly from the reservoir. Usually the pump cover gasket can be seen protruding slightly between the cover and body if it is blown. Remove nine screws from the body to expose the gasket. Follow pump removal instructions on page 9-8 of your 1974 and 1975 85, to 135 H.P. service manual and the head gasket repair kit instruction sheet.
d. When reassembling pump cover to pump body, keep the pump cover level with pump body when running in screws. Tightening sequence shown on instruction sheet of pump repair kit P/N 172886 must be observed. Check pump rotor for binding. If any binding is felt it can usually be eliminated by seating the pump cover. Use a hammer and brass rod and tap cover in several places around the pump shaft inside the hold down screws. If binding is relieved, retorque screws to fifty inch lbs. If shaft still binds replace pump assembly.
Trim cylinder - testing for leak down both ranges.
a. Remove sending unit from trim cylinder.
b. Run tilt unit up to top of trim range. Trim piston is now up to edge of opening and any oil that has bypassed piston (T) ring seal will run out of the terminal opening.
ec. Let unit stand until it has leaked down about * inch of piston rod travel. The rate of leak down depends on severity of problem.
d. Run unit up to top of trim range again. Any oil that has leaked past trim cylinder piston will run out of terminal hole.
e. If oil leaks out replace (T) ring seal or replace cylinder assembly. If no oil appears trim cylinder can be presumed okay.
Tilt cylinder
a. If (3Aa) through (3Cc) test above are okay-problem is in tilt cylinder. Therefore, you must remove and disassemble it to find cause of problem.
b. The most likely cause of problem is leakage past the tilt cylinder (T) ring seal on piston.
c. There is a possiblity that both relief valve in relief valve assembly and upper stem valve O-ring are damaged which would result in same symptoms.
d. Repair or replace as required.
PAGE 7SERVICE BULLETIN #1086
PAGE 7
4.
SERVICE BULLETIN #1086
Won't Tilt Down
A.
When unit will not tilt down from full tilt up position loosen manual release valve momentarily to relieve pressure on bottom of cylinders. If unit will now tilt down the problem may be a combination of a close fitting tilt cylinder piston allowing high pressure to be developed at the maximum tilt position and dirt in the pump relief valve not allowing sufficient pressure to be developed to open the check valve. To modify tilt piston to the latest specifications, remove the piston from the rod (using a soft-
jaw vise), and cut a slot across the top of the piston through the two smaller holes, about 1/64 inch deep with
a hacksaw.
When engine does not come down in test above, problem may be the tilt bolt. Inspect for corrosion or rust.
If it does come down with manual release valve open-test 4A above but won't come down when motor is energized
check for stuck shuttle valve. Shuttle valve can be moved by removing "up" check valve and grasping projection on end of shuttle valve with smooth-jaw needle nose pliers.
Trims or Tilts Too Slowly - Does Not Leak Down
A.
Check pump motor for normal sound, (not too slow) battery condition and amperage draw. See page 4, step 4D Self Energizing Switch.
Check for binding in tilt bolt as in (4B) above. Check for cut O-rings on shuttle valve allowing oil to
bypass to low pressure side of pump resulting in low pressure to tilt and trim cylinders.
Leaks Down Only After Powering Down
A.
Hit and release tilt switch quickly for up function. If this stops leak down the problem is stuck shuttle valve. Check as in (4C) above.
EVINRUDE MOTORS Service Department