Johnson Service Bulletin #665 (1958) - Adjusting the V-4 Carburetor

Factory procedure for synchronizing and adjusting the two high-speed and two slow-speed needle valves on the 1958 Johnson V-4 two-barrel carburetor. Includes the initial settings, ten adjustment steps, three factory photographs, and a warning about tank testing with the gearcase plate removed.

Johnson Service Bulletin letterhead
June 27, 1958SERVICE BULLETIN #665
ADJUSTING THE V-4 CARBURETOR

The 1958 V-4 2 barrel carburetors are equipped with 2 high speed and 2 slow speed needle valves. The high speed needles are synchronized with a control gear unit which, when engaged, turns both high speed needles the same distance. The slow speed needles are independent of each other and are so designed that they can be turned only so far with the adjusting knobs.

Both the high speed and slow speed needles are adjusted during the final test run at the factory. However, in case it is necessary to make adjustments beyond that possible thru the use of the knobs, only the following procedures should be followed. (for best results the motor should be running on a boat, however, carburetor adjustments may be made while the motor is in a test tank)
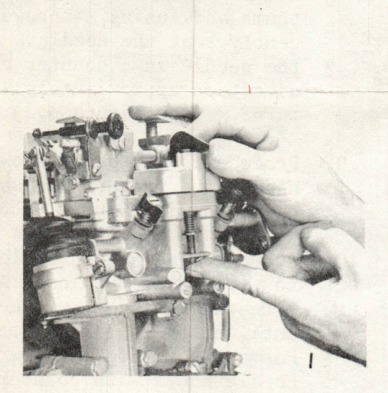
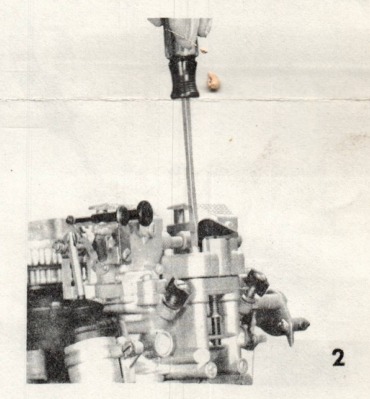
Figure 1: high-speed needle control gear knob
1
Figure 2: screwdriver adjusting high-speed needle
2
  1. Lift the high speed needle valves control gear knob and turn 180° so that the pointer end rests on the raised portion of the carburetor control gears cover. The synchronized gears of the control knob and high speed needles have now been disengaged and each needle valve is free to be turned individually. (see figure 1)
  2. Seat each needle gently by turning in a clockwise direction. Then turn back in a counter-clockwise direction 3/4ths turn.
  3. Start the motor and permit to run until normal operating temperature has been reached. (Indicated in the thermostatically controlled V-50 by a decided increase in water "spurting" out of discharge tube in the exhaust stack assembly.)

Superior Service Spells Satisfaction
SERVICE BULLETIN #665Page 2
  1. Advance speed control to full throttle, and with a screwdriver, slowly turn one high speed needle in clockwise direction until the motor begins to slow down. IMPORTANT - stop immediately when the motor begins to slow down. Then turn the needle in counter-clockwise direction 1/8th turn. (see figure 2)
  2. Proceed to the other high speed needle and follow the same procedure. Do NOT expect an immediate reaction from the motor. It will take approximately 15 seconds for the motor to again pick up speed. This point is of prime importance in adjusting the high speed needles of this particular carburetor. Also, because of this slow reaction to needle changes we cannot adjust this carburetor by ear as we do on the other models.
  3. Restore the high speed needle valves control gear into position so that the pointer falls mid-way (position 3) between the extreme limits of the synchronized adjustment knob.
  4. To check the settings, turn the synchronized adjustment knob open (clockwise direction) very slightly. If the motor picks up r.p.m.'s leave it there. If the motor does not pick up r.p.m.'s then turn the synchronized adjustment knob back (counter-clockwise direction) to the original setting as in point 5 above.
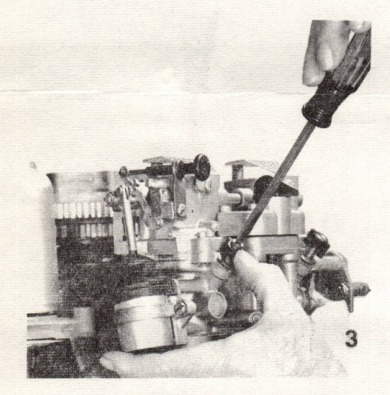
Figure 3: adjusting the slow-speed needle valve with screwdriver
Figure 3
  1. Stop motor. Hold the slow speed needle valve knob down with the thumb and, using a screwdriver, gently seat the needle. Then turn the needle in a counter-clockwise direction approximately 1-1/2 turns. (see figure 3)
  2. Proceed to the other slow speed needle and perform the same procedure as in number 8 above.
  3. Start engine and throttle the motor to slow idle position. Adjust alternately, each slow speed needle until motor is idling smoothly. Restore position of slow speed needle knobs with pointer falling at mid point of limited adjusting quadrant.

The V-4 carburetor is now adjusted and synchronized. The operator (owner) should be advised against personally disturbing this balance, other than within the range limits of the quadrants to compensate for atmospheric and other prevailing conditions of operation.

JOHNSON MOTORS
Walter McLeod
Walter McLeod
Service Department

NOTE: When tank testing, do not remove plate on side of gearcase. This is part of re-circulating system in thermostatically controlled engines. The engine will not reach pre-determined running temperature and carburetor cannot be adjusted properly if plate is removed.