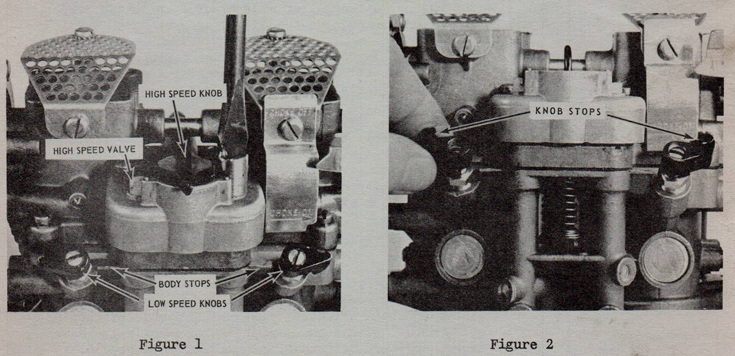
The 1960 model V4S-12 series engines are equipped with two-barrel carburetors
utilizing two high speed and two low speed needle valves, one of each valves
per barrel. The high speed needles are controlled through a synchronizing
gear unit which provides minor adjustment of both needles simultaneously with
operation of a single high speed adjusting knob. Low speed needles are adjusted
independently, and are provided with stops on the adjusting knobs which, when
rotated approximately 180° in either direction, contact the body stops located
on the carburetor throttle body, Fig. 1.
High and slow speed needles are adjusted during the final test run at the
factory, and should be correct for all installations with only minor knob
adjustment to compensate for changes in atmospheric conditions. Should it,
however, be necessary to make corrections in settings beyond the minor adjust-
ments permitted by the stops, the adjustment procedure given below should be
followed. For maximum results, all carburetor adjustments should be made
while running on a boat. Since this is not always possible, adjustments made
in a test tank are usually quite close to those desired. When a carburetor is
adjusted in a tank, final minor adjustments, if required, should be easily
accomplished after mounting the engine on the boat.
Figure 1
Figure 2
(over)
- 2 -
Proceed adjusting as follows:
1 (a) Before attempting to start the engine, raise the high speed needle
control knob to disengage the synchronizing gears. Turn 180°, left
or right, so the pointer rests on top of the raised portion of the
carburetor control gear cover. The synchronizing gears are now dis-
engaged permitting each needle valve to be turned individually,
(Fig. 1).
(b) Gently seat each high speed needle by turning in a clockwise direction.
Then turn back 3/4 turn in a counter-clockwise direction.
2 (a) Remove low speed adjusting knobs, turn upside down and replace them on
their respective needle shaft. NOTE: This reverses the stops so they
will point upward and away from the body stops to permit greater
adjustments, (Fig.2)
(b) Gently seat each low speed needle by turning clockwise, then turn in a
counter-clockwise direction 1¼ to 1½ turns. CAUTION: Should difficulty
be experienced in feeling needle seat, loosen packing gland nuts slightly.
DO NOT, however, FAIL to retighten them after this step has been completed.
3 Replace engine cover on engine if it was removed. NOTE: Carburetor
adjustments should always be made with the engine cover secured in place
because air inside the cover is heated by the powerhead before entering
the carburetor. This factor must be taken into consideration when
making fine adjustments.
NOTE: Since it is almost impossible to detect minor speed changes in
the V-4 type engines, a tachometer must be used to obtain proper
adjustment. Use one throughout the adjusting procedure.
4 Start engine. NOTE: Before further attempting fine carburetor
adjustments, allow the engine to reach normal operating temperature by
running at ½ throttle, or slightly more, for at least 5 minutes before
proceeding to step 5.
5 With engine in gear, run at full throttle. Using a screw driver, very
slowly turn one high speed needle in a clockwise direction until the motor
begins to slow down. Stop immediately and turn needle 1/8 turn in a
counter-clockwise direction, (approximately 2 clicks on the detent),
(Fig. 1). ALLOW 15 SECONDS FOR ENGINE TO RESPOND. Adjust the second high
speed needle in a like manner. NOTE: Repeat this step as necessary,
alternating from needle to needle, to obtain maximum balance between high
speed adjustments.
6 With engine still in gear, but throttle retarded to idle position (600
R.P.M's), slowly lean one low speed needle valve by turning clockwise
until engine hesitates or spits slightly, then enrich needle by turning
counter-clockwise 1/8 turn. Adjust the second needle exactly the same
way. NOTE: Repeat as necessary, alternating from needle to needle, to
obtain maximum balance between low speed adjustments.
- 3 -
7. Return to high speed needle valves and repeat step 5. NOTE: Close door on
motor cover. Do not expect immediate engine response. The engine will
take approximately 15 seconds to react and again pick up R.P.M. This
point is important in adjusting the high speed needles of this particular
carburetor because the engine responds slowly to high speed needle valve
adjustment.
8 Return to low speed needle valves and repeat step 6. NOTE: Upon completion
of this step, enrich both low speed needle valves by turning each one an
additional 1/16 to 1/8 turn counter-clockwise, NO MORE!
9 Remove low speed knobs and replace with knob stops down. Position knobs so
their levers point outward from the center of the carburetor, (Fig.1).
10 Replace the synchronizing high speed control knob by reversing it 180° so
the pointer falls on position 3, midway between the limits of the knobs travel.
The carburetor is now properly adjusted and synchronized. The owner should be
advised against personally disturbing this balance other than to make small ad-
justments, within limits of the stops, to compensate for atmospheric and other
prevailing conditions which affect performance.
IMPORTANT NOTE: No amount of carburetor adjusting will cause a poorly performing
engine to operate at its peak potential if other related functions are out of
order. The entire electrical system, including battery, wiring, electrical
connections, magneto and spark plugs, should be functioning properly. Compression
should be adequate, carburetor and magneto should be properly synchronized, (refer
to service bulletin #SB-739 dated 9/24/59). Should either, or any combination, of
these points be malfunctioning, attempted carburetor adjustment is useless.
Correct the foregoing points if found to be out of order and then proceed to
adjust the carburetor.
JOHNSON MOTORS
W. W. DeWees
Service Department
WWD:eb
NOTE: Post on your V-4 index - 75 H.P.
W. W. DeWees
Related bulletin: SB-739 (September 24, 1959), referenced by the factory for carburetor and magneto synchronization. Link omitted until the archived page is verified.